

Social login (OAuth)
Groveback supports per-project social sign-in. Each project configures its own provider apps — its own Google or GitHub client id and secret — so two projects in the same deployment can use entirely different OAuth apps, or none.
Supported providers today: Google and GitHub.
1. Deployment prerequisite
Section titled “1. Deployment prerequisite”Client secrets are encrypted at rest with a deployment master key. Set it once — the server refuses to start in production without it:
GROVEBACK_SECRET_KEY=<a long random string, at least 16 chars>The callback also needs the server’s public base URL so the provider can redirect back. Set
GROVEBACK_BASE_URL (no trailing slash), e.g. https://api.example.com.
When it is unset the server derives the base URL per request — X-Forwarded-Proto and
X-Forwarded-Host behind a reverse proxy, else the request’s own host — so the flow works out
of the box. Setting it explicitly is still recommended when the deployment is reachable under
several hostnames, because the provider only accepts the exact registered URI.
2. Register the app with the provider
Section titled “2. Register the app with the provider”Every provider needs one callback URI, always of this form:
<GROVEBACK_BASE_URL>/api/v1/auth/oauth/<provider>/callbackFor example https://api.example.com/api/v1/auth/oauth/google/callback. It must match
exactly.
- In Google Cloud Console → APIs & Services → Credentials, pick or create a project.
- Configure the OAuth consent screen (User type External); add a support email and the
emailandprofilescopes. - Create credentials → OAuth client ID → Web application.
- Under Authorized redirect URIs, add the callback URI above.
- Copy the Client ID and Client Secret.
Groveback requests openid, email, profile.
GitHub
Section titled “GitHub”- Go to Settings → Developer settings → OAuth Apps → New OAuth App.
- Set Homepage URL to your app.
- Set Authorization callback URL to the callback URI above.
- Register, then Generate a new client secret.
- Copy the Client ID and the new secret.
Groveback requests read:user, user:email.
3. Configure the provider on the project
Section titled “3. Configure the provider on the project”Pick one of three surfaces — they all hit the same admin API.
Dashboard
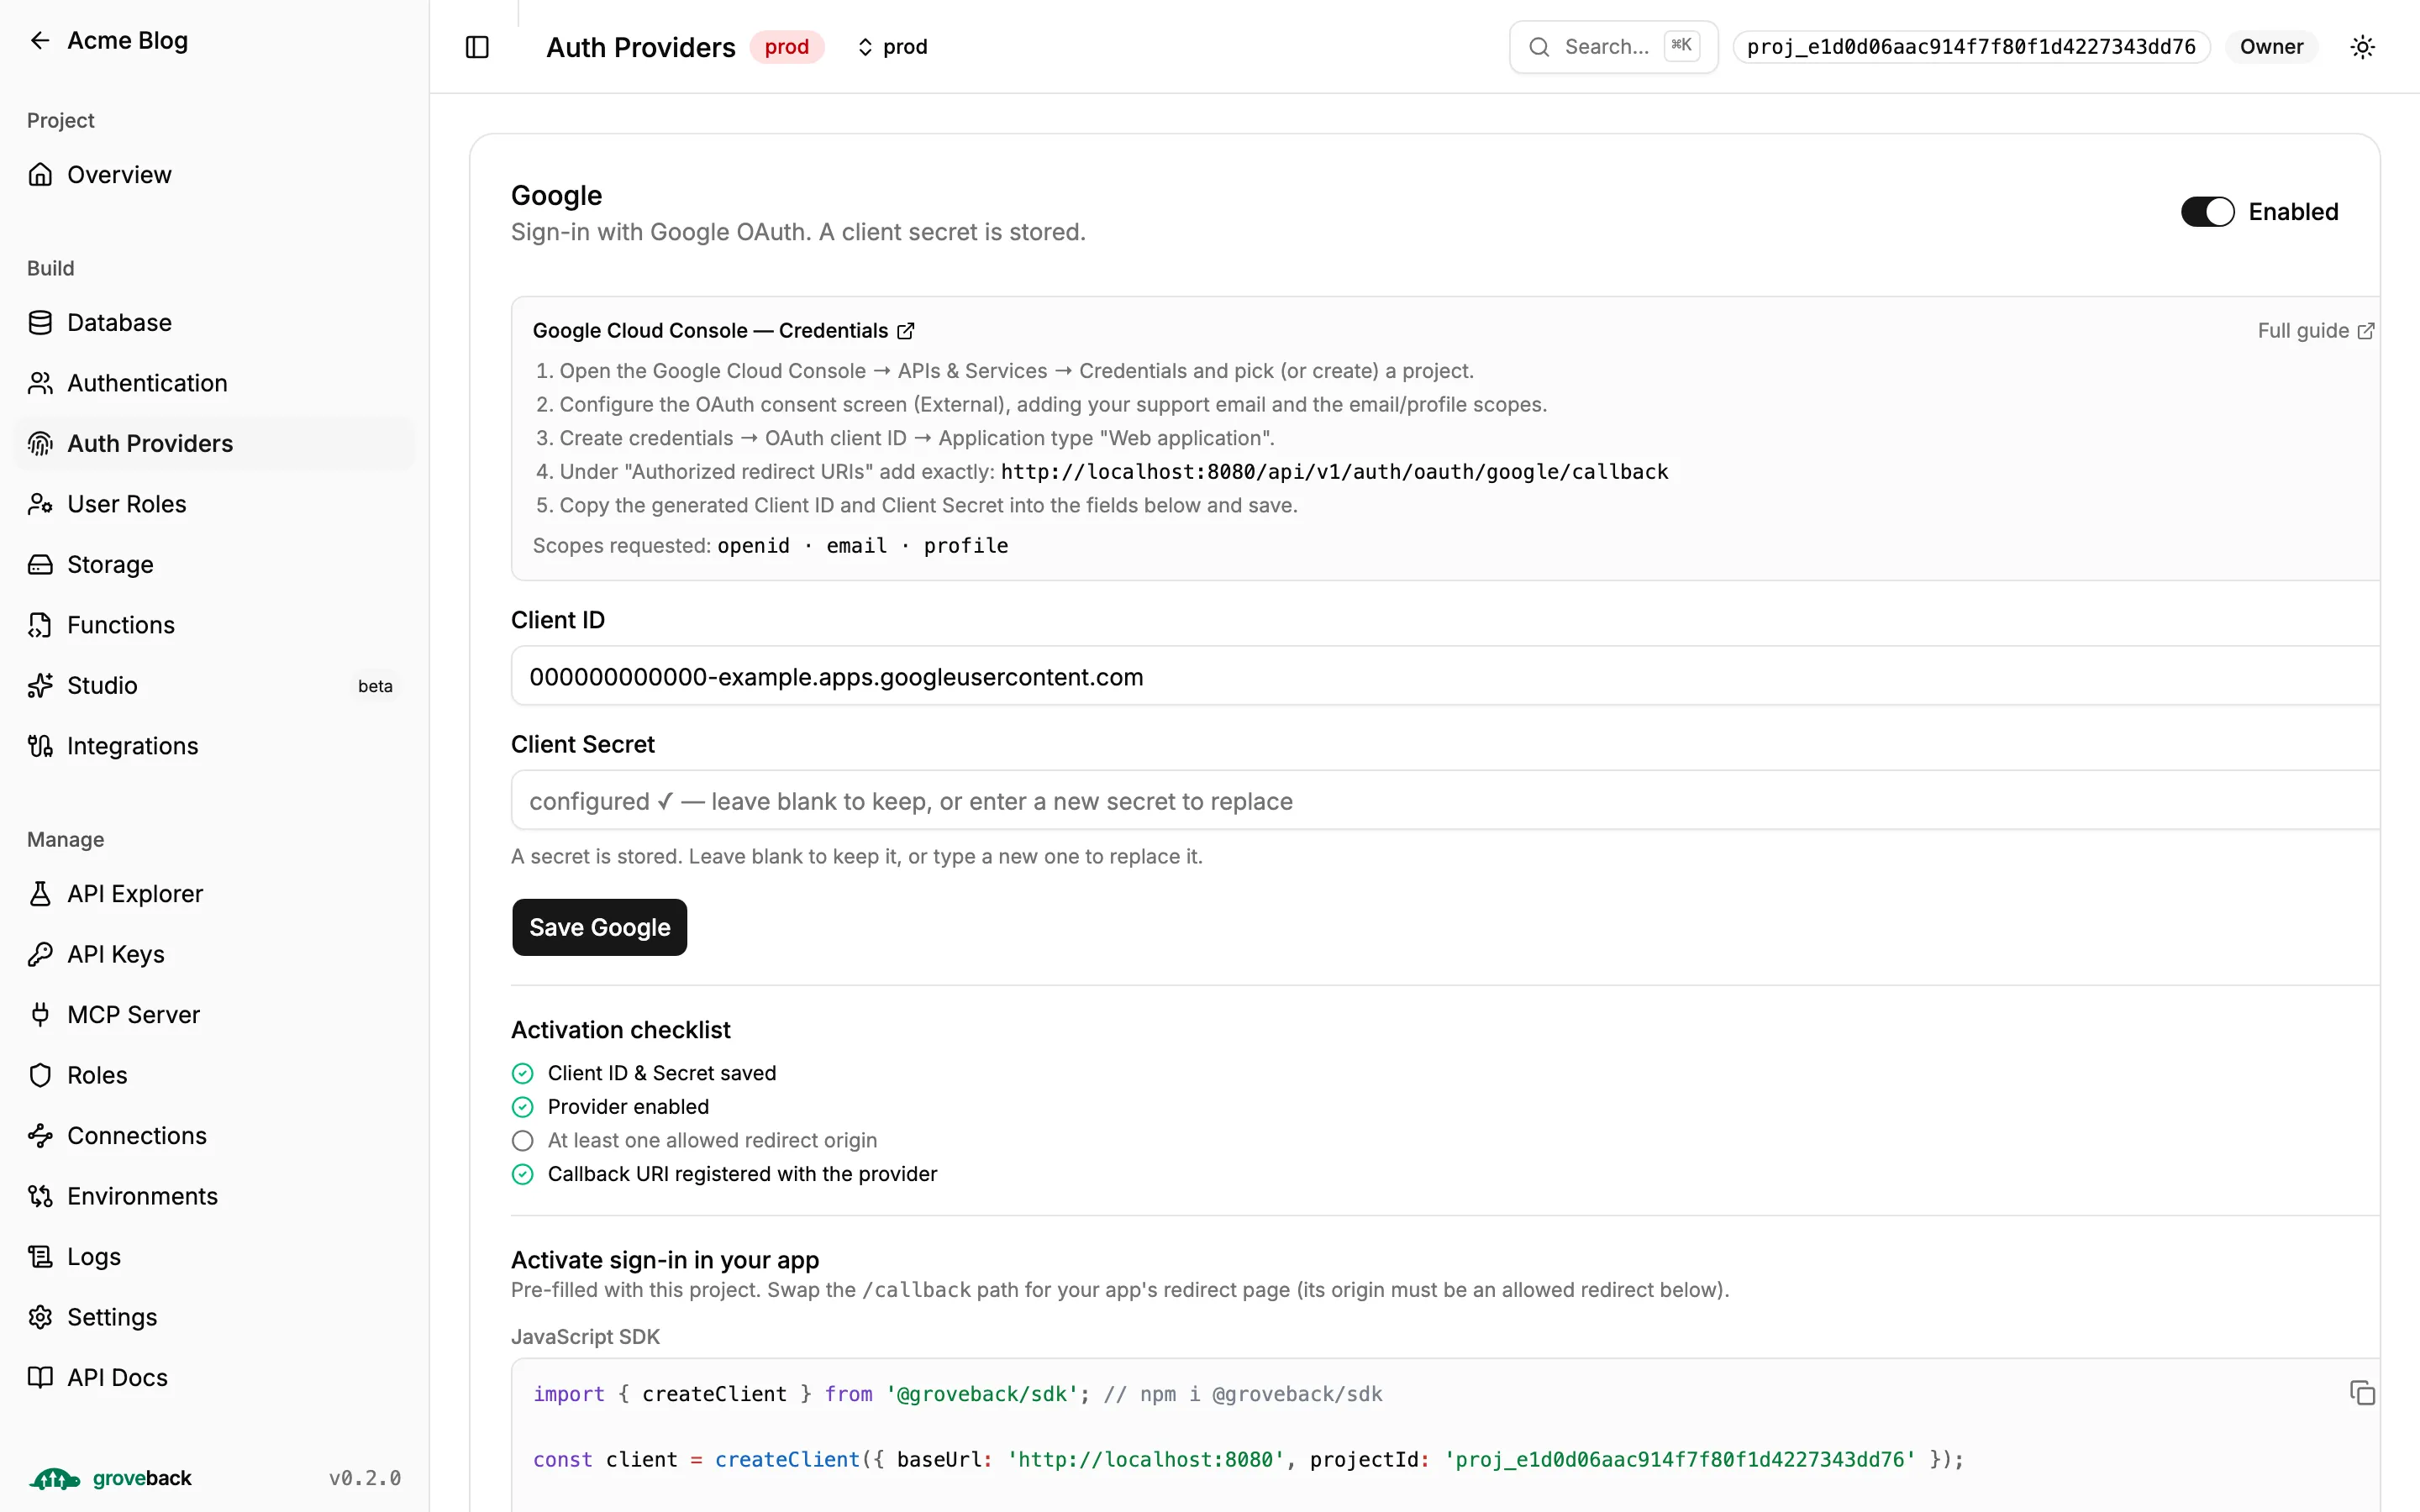
Section titled “Dashboard”Project dashboard → Auth Providers (under Build). Paste the client id and secret, toggle Enabled, save. Then in the Allowed redirects card, add every app origin that may receive the login result and save.
Each provider card shows the exact callback URI for that provider. Secrets are write-only —
the dashboard never shows a stored secret back. To change it, type a new one; to only toggle
enabled or edit the client id, leave the secret blank.
Admin REST API
Section titled “Admin REST API”curl -X PUT "$BASE/api/v1/admin/auth/oauth/providers/google" \ -H "authorization: Bearer $ADMIN_TOKEN" -H 'content-type: application/json' \ -d '{ "clientId": "…apps.googleusercontent.com", "clientSecret": "…", "enabled": true }'curl -X PUT "$BASE/api/v1/admin/auth/oauth/redirects" \ -H "authorization: Bearer $ADMIN_TOKEN" -H 'content-type: application/json' \ -d '{ "origins": ["https://app.example.com"] }'curl "$BASE/api/v1/admin/auth/oauth" -H "authorization: Bearer $ADMIN_TOKEN"clientSecret is required the first time a provider is configured. On later edits you may
omit it to keep the stored one — handy when you only want to flip enabled. Reads never
return a secret; they show configured: true|false.
The write routes are gated on auth:config:write, the read route on auth:config:read. The
built-in Admin and Owner roles and admin API keys hold both.
Redirect origins are normalized to bare origins, and the list is replaced, not merged.
get_oauth_config, set_oauth_provider and set_oauth_redirects — see the
MCP reference.
4. Wire the login in your app
Section titled “4. Wire the login in your app”The flow is a browser redirect round-trip. The result — a refresh token, or an MFA challenge — comes back in the URL fragment of your redirect page, so it never reaches server logs.
With the SDK
Section titled “With the SDK”import { createClient } from '@groveback/sdk';
const client = createClient({ baseUrl: 'https://api.example.com', projectId: 'proj_…' });
// 1. Send the user to the provider. `redirect` must be an allowed origin.window.location.href = client.auth.oauthStartUrl('google', 'https://app.example.com/callback');
// 2. On the redirect page, complete the round-trip from the fragment:const result = await client.auth.completeOAuth(window.location.hash);if ('mfaRequired' in result) { const user = await client.auth.verifyMfa(code);} else { // result is the signed-in user; the SDK now holds the session.}Raw HTTP
Section titled “Raw HTTP”- Navigate to
GET <BASE>/api/v1/auth/oauth/<provider>/start?project=<pid>&redirect=<app-url>. - The provider returns the user to your
redirectwith a fragment:
| Fragment | Meaning |
|---|---|
#mb_refresh=<token> |
Success — POST it to /api/v1/auth/refresh for an access token. |
#mb_mfa=<token> |
The account has MFA — finish at /api/v1/auth/mfa/verify. |
#mb_error=<reason> |
Failure. |
The callback never returns an error status — failures come back as #mb_error, because at
that point the user is in a browser mid-redirect.
Hosted login page
Section titled “Hosted login page”The backend serves a complete minimal login page — email/password plus a button per enabled provider — so an app can delegate sign-in entirely:
window.location.href = client.auth.hostedLoginUrl('https://app.example.com/callback');const result = await client.auth.completeOAuth(window.location.hash);Raw URL: GET <BASE>/auth/login?project=<id|slug>&redirect=<app-url>. It delivers tokens
using the same fragment contract, so completeOAuth finishes either flow.
Test it without writing code
Section titled “Test it without writing code”The server ships a test page at <BASE>/examples/oauth. Open it, enter the project id, and
click sign in — it runs the full round-trip and prints the user.
Because that page uses its own origin as the redirect, the backend’s own URL (e.g.
http://localhost:8080) must be in the project’s allowed redirects.
How accounts link
Section titled “How accounts link”When a provider identity comes back, Groveback resolves it in this order:
- Known identity (
provider+subject) → sign that user in. - Unknown identity, matching email → link the provider to the existing account. A
provider-verified email also upgrades
emailVerified. - No match → create a passwordless account. Password login stays impossible for it until the user does a password reset.
So a user can sign up with email/password and later use “Sign in with Google” on the same address, or the reverse, and end up on one account.
Troubleshooting
Section titled “Troubleshooting”| Symptom | Cause |
|---|---|
404 OAuth is not configured, or unknown provider on /start |
The provider is not enabled for this project, or its client id/secret are unset. |
INVALID_REDIRECT on /start |
The redirect origin is not in the project’s allowlist. |
#mb_error=exchange_failed |
Wrong client id or secret, or the callback URI registered with the provider does not match exactly. |
400 INVALID_STATE on /callback |
The signed state expired (10-minute TTL) or was tampered with. Restart the flow. |
| The server will not boot in production | GROVEBACK_SECRET_KEY is missing or too short — it is needed to decrypt stored secrets. |